Install the first UCC
Pre-install checks
- Start Skype for Business Server Management Shell, use the Get-CsManagementStoreReplicationStatus command and check if UpToDate is true.
- Check the Skype for Business Server Deployment Wizard if steps 1 and 3 are completed.
- When a failover install is done, check if all servers are within the same pool. Type Get-CsTrustedApplicationComputer in Skype for Business Server Management Shell.
- When installing on a Lync2013 / Skype for Business server make sure the installation dvd is mounted.
Install Core
-
Copy Core Install files to the AnywhereNow Server, for example drive:\install.
-
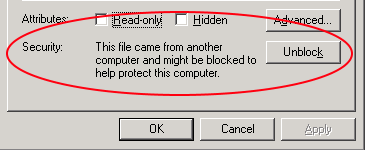
Make sure that the .zip package is unblocked:
- Right click on the .zip file and choose ‘properties’
- Then click Unblock and Apply
-
Unpack .zip package.
-
Edit properties file (properties.ps1)
-
Set an application id, used for trusted endpoints + The Session Initiation Protocol, or SIP, is a protocol for multimedia communication (audio, video and data communication). SIP is also used for Voice over IP (VoIP). SIP has interactions with other Internet protocols such as HTTP and SMTP. address
PowerShell$AppId = "< application id >"
Warning
Use lowercases and no spaces.
-
Set the domain name of the service account
PowerShell$domain = "<domain name>"
-
Set the service account name without the domain name
PowerShell$account = "<service acount name> (no domain)"
-
Set the application pool FDQN stands for Fully Qualified Domain Name and specifies the exact location in the tree hierarchy of the Domain Name System (DNS). An example for [hostname].[domain].[top level domain] is [www].[microsoft].[com]
PowerShell$AppPoolName = "< app pool fqdn of the Anywhere365 server>"
Tip
You can look this up in PowerShell:
PowerShellGet-CsTrustedApplicationPool | select PoolFqdn | Sort PoolFqdn
-
Specify a port number
PowerShell$Port = 6000
-
Specify the sip domain name
PowerShell$SipDomain = "< sip domain name (domain.com)>"
Warning
Use lowercases and no spaces.
-
(Optional) Specify the Settingsurl
PowerShell$settingsUrl = "<settingsurl>"
Example settingsurl: "<https://company.sharepoint.com/sites/anywhere365/ucc_name01>"
This is the direct url to the sharepoint configuration of the A Unified Contact Center, or UCC, is a queue of interactions (voice, email, IM, etc.) that are handled by Agents. Each UCC has its own settings, IVR menus and Agents. Agents can belong to one or several UCCs and can have multiple skills (competencies). A UCC can be visualized as a contact center “micro service”. Customers can utilize one UCC (e.g. a global helpdesk), a few UCC’s (e.g. for each department or regional office) or hundreds of UCC’s (e.g. for each bed at a hospital). They are interconnected and can all be managed from one central location.
-
-
Save the properties file.
-
Make sure the Skype for Business DVD is mounted.
-
Open power shell as administrator
-
(When using pre Windows 2012 R2) Set-ExecutionPolicy remotesigned
-
Y

-
-
Navigate to extracted files
-
Run installUCC.ps1
PowerShelldrive:\Install\UCC-xx> .\InstallUCC.ps1
-
This will take some time
-
Red text means an error, check the error before restarting
- Error: "Grant-CsConferencingPolicy: Wait a minute and start installUCC.ps1 again
- Error: Remote PowerShell: Run create LyncObjectsscript on Front End Server
-
-
During the installation the following prompts will be offered
- Enter password for ...- Enter the password of the account entered in the properties.ps1
- Do you want to install a local SQL-Express instance? - If Local SQL Express will be used, select yes.
- Please select disk letter for install location - When the server has multiple disks, select the correct disk. (will be skipped of only 1 disk is available)
- If you would like to provide a custom application id.... - You can use an alternative application id for the presence provider, for example is you have multiple application servers.
-
Read the warnings very carefully to see whether the server needs a reboot. If not sure, just reboot the server.
Adding a License Key
-
Request Key at AnywhereNow
-
Receive License Key from AnywhereNow
-
Copy key to
Tip
6.3: C:\ProgramData\Anywhere365\Core\Service\UnifiedContactCenterService\
6.0: C:\Program Files\Anywhere365\Core\
5.0: C:\Program Files\UCC\
-
Configure license in Config.xml (Example file provided in Core installation media folder.)
-
Copy config.xml to
The default path of this file is:
C:\ProgramData\Anywhere365\Core\Service\UnifiedContactCenterService\Config.xml
Continue
Continue reading on how to install your first UCC.
Install SharePoint Template
AnywhereNow SharePoint UCC Site Creator