Install Snapper for Skype for Business
Preparation
Before starting the installation, make sure the following preparations are taken on the device that will run the Snapper:
-
Microsoft Lync (formerly Microsoft Office Communicator) is an instant messaging program designed for business use and is the successor of Windows Messenger. In order to use Lync, a Microsoft Lync Server is required. 2013, Skype for Business is installed;
-
Make sure the latest Windows updates are installed
-
-
Latest .NET Framework 4.x (minimum 4.6.2) is required
Current Windows 10 and Windows 11 already comes with .NET framework 4.8.x pre-installed)
-
Latest Microsoft ASP.NET Core Runtime and .NET Desktop Runtime are required and installed.
Microsoft .NET 8.0 is nearing End-Of-Life. See: https://dotnet.microsoft.com/en-us/download/dotnet. Any Snapper running on the .NET 8.0 library will subsequently impact support.
As Snapper is currently in maintenance mode we strongly encourage our remaining customers to replace Snapper with our modern client applications WebAgent and Workspace. For guidance and feature comparisons please reference Dialogue Cloud Client Experience Comparison.
A Snapper running on a .NET 10.0 is available upon request via AnywhereNow Support (https://support.anywhere.now/csm).
To download the two .NET 10.0 runtimes from Microsoft, see: https://dotnet.microsoft.com/en-us/download/dotnet/10.0
These runtimes are required, their bit-level should match the version of Snapper installer (x64 or x86) which is dependant on your desktop architecture preference.
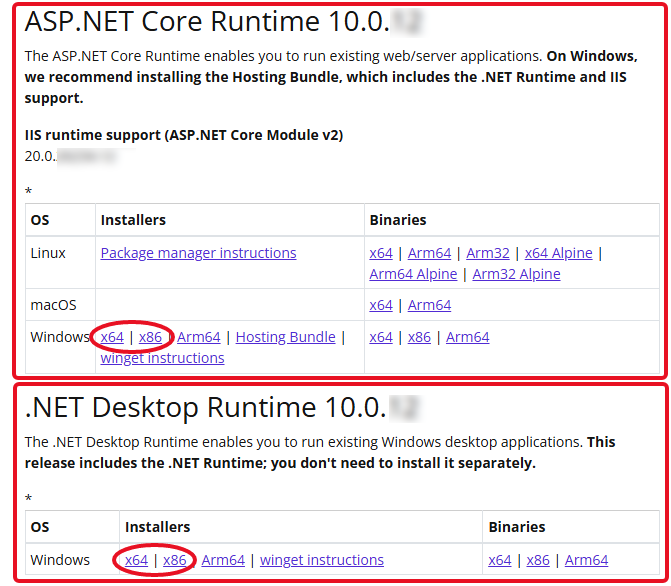
-
User is logged in
-
Minimal Screen Resolution 1920 x 1080 (scaling not higher than 150%)
(Optional) If you want to save your screen recordings to SharePoint, you will have to create the following document libraries within the A Unified Contact Center, or UCC, is a queue of interactions (voice, email, IM, etc.) that are handled by Agents. Each UCC has its own settings, IVR menus and Agents. Agents can belong to one or several UCCs and can have multiple skills (competencies). A UCC can be visualized as a contact center “micro service”. Customers can utilize one UCC (e.g. a global helpdesk), a few UCC’s (e.g. for each department or regional office) or hundreds of UCC’s (e.g. for each bed at a hospital). They are interconnected and can all be managed from one central location. settings page:
Note
If the provided credentials have permissions to create document libraries on the SharePoint site, they will be created automatically upon first use.
- InboundScreenRecordings
- OutboundScreenRecordings
When the above preparations are completed, the installation can be continued.
Installing the Snapper
Note
Snapper install needs to match the same bit-rate as the Skype client (32x or 64x)
The following steps describe the installation process of the Snapper.
-
Run the msi file to start the setup program.
Note
Installation files can be requested from AnywhereNow or Partner.
(When receiving the installer as a .zip file please check whether the file is “Unblocked” in the file properties BEFORE extracting the installer)
-
Click “Next”
-
Read and accept the License Agreement by checking the “I accept the terms in the License Agreement” box.
-
The following screen will display the available features:
-
Always install the “Anywhere365 Snapper (xx bit)”.
-
-
Click “Install”
-
The Snapper will now be installed
-
Select “Finish” to close the setup
-
Run the shortcut to start the Application
Configure the Snapper
The Snapper has an auto-discovery feature, so you only need to add 1 UCC.
- Start the Snapper
- Open Settings button on the main toolbar (bottom)
- Open tab UCC Config
- Click Add UCC
- Enter the information:
- UCC Name =
ApplicationIdof the UCC - UCC Host = FDQN stands for Fully Qualified Domain Name and specifies the exact location in the tree hierarchy of the Domain Name System (DNS). An example for [hostname].[domain].[top level domain] is [www].[microsoft].[com] of UCC
- Secure = Which protocol should be used. http:// or https://
- (Optional) Autodiscover = Automatically add other UCC's where the user is an Agent or Supervisor (leave disabled if you are only agent in one UCC or want to only see one UCC)
- (Optional) Advanced menu allows you to enter credentials for secure access to the AnywhereNow web services. For secure Attendant service Learn More, or secure Dashboard service Learn More.
- UCC Name =
- Click on save