Configuring authentication for CRM Service for Dynamics 365
The AnywhereNow integration for Microsoft Dynamics CRM Customer Relationship Management, or CRM, is (usually) a software-based, data management method to deal with interactions with customers and potential customers. supports ClientSecret authentication. This requires ClientSecret authentication to be set up for your Microsoft Dataverse Dataverse lets you securely store and manage data that's used by business applications. Data within Dataverse is stored within a set of tables. A table is a set of rows (formerly referred to as records) and columns (formerly referred to as fields/attributes). [From: Microsoft Docs].
The WS-Trust authentication protocol that has been used until now to connect to the Microsoft Dataverse will be deprecated on April 4th 2022. If your CRM Service for Dynamics 365 was configured to use this authentication method, it will need to be reconfigured to prevent service interruption.
To configure authentication for CRM Service for Dynamics 365, you will need to create a connection string according to the following instructions.
Note
The AnywhereNow password tool is required to generate the necessary secure connection string. Without this tool, you will not be able to generate the connection string. This tool is part of the UCC A Unified Contact Center, or UCC, is a queue of interactions (voice, email, IM, etc.) that are handled by Agents. Each UCC has its own settings, IVR menus and Agents. Agents can belong to one or several UCCs and can have multiple skills (competencies). A UCC can be visualized as a contact center “micro service”. Customers can utilize one UCC (e.g. a global helpdesk), a few UCC’s (e.g. for each department or regional office) or hundreds of UCC’s (e.g. for each bed at a hospital). They are interconnected and can all be managed from one central location. package.
Configuring CRM Service for Dynamics 365 to use ClientSecret authentication
Updated Microsoft authentication protocols specify more secure means to allow applications to communicate with each other and authorize access to data. Creating an Azure Application Registration is an essential part of this authorization process.
Prerequisites
To configure authentication for CRM Service for Dynamics 365 you will need the following:
- Access to an Microsoft Entra ID tenant A dedicated and trusted instance of Azure AD. The tenant is automatically created when your organization signs up for a Microsoft cloud service subscription, such as Microsoft 365. An Azure tenant represents a single organization. [Taken from Microsoft Docs] to be used to register the provided sample application;
- A Microsoft Dataverse subscription that is associated with the Microsoft Entra ID Formerly known as Azure Active Directory (or Azure AD, or AAD) tenant;
- Administrator privileges in the Microsoft Entra ID Formerly known as Azure Active Directory (or Azure AD, or AAD) tenant and Dataverse environment;
- The AnywhereNow password tool;
For more information about Azure Application Registration see Microsoft's Use single-tenant server-to-server authentication (Microsoft Dataverse) - Power Apps | Microsoft Learn.
The ClientId and ClientSecret IDs are created during the Azure App Registration procedure.
To register a new Azure application
-
Sign in to your organization's Azure Portal via this Link to Azure Portal.
-
From the Azure Portal Menu, select Microsoft Entra ID, then select App registrations.
-
In the App registration window, select New registration.
-
In the Register an application window that appears, do the following:
- In the Name field, enter suitable name for your application. This name can be changed at any time. It will be used in a later configuration step (see To create a Dynamics 365 application user).
- In the Supported account types section, select Single tenant only.
- Don't enter anything for Redirect URI (optional) .
- Select Register to complete initial app registration. Details of your newly created app will appear.
This short video provides an overview of the above procedure:
-
Click on the Copy button to the right of the Application (client) id to copy the number you will use as the ClientID in a later step.
 ID")
-
Choose Certificates & secrets from the Manage menu list and choose New client secret. In the Add a client secret pane that appears, do the following:
- Enter a Description to identify the client secret
- Select an expiry date in the Expires drop down menu
- Click on Add to create the client secret
-
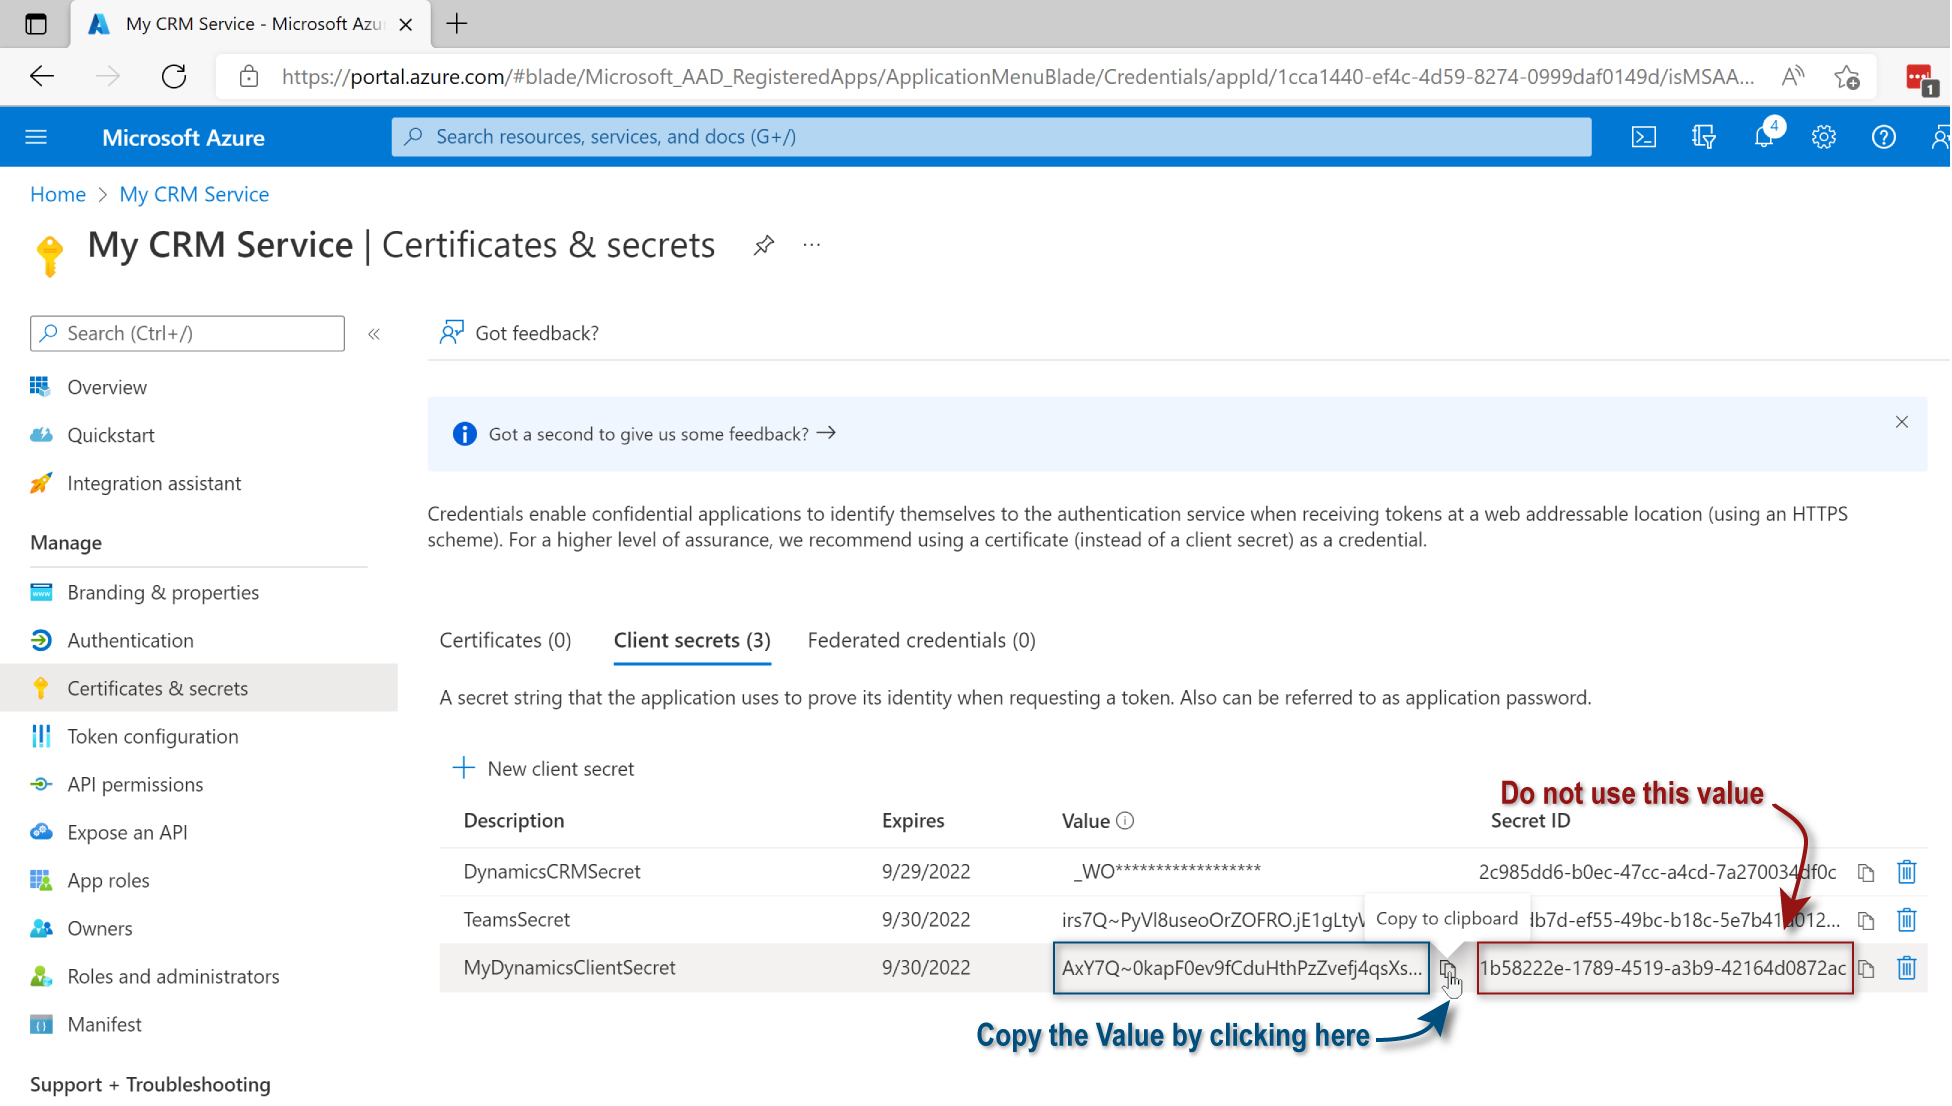
For the Client secret you just created, click on the Copy button to the right of the Value entry to copy the ClientSecret value we will be using in a later step (see image). Do not use the Secret ID.
-
Choose API permissions from the Manage menu list and choose Add a permission. In the Request API permissions pane that appears, do the following:
- Select Dynamics CRM and then select Delegated permissions.
- Find the user_impersonation permission and click the check box next to it.
- Select Add.
The Client secret you just created will appear in the Client secrets list.
Warning
Both the client secret and the connection string will stop working after the expiry period. It is highly recommended that you set yourself a reminder to update these before they expire.
Warning
Client secret Values can only be viewed and copied immediately after creation. It is essential to copy and save this value before leaving the page.
Creating a Dynamics 365 application user
To access an Azure application you must use an Application user. A Dynamics 365 application user is tied to a Microsoft Entra ID application and performs tasks in Dynamics 365 on behalf of that application. This procedure is described in the following section. For additional information, refer to Microsoft's Manage application users in the Power Platform admin center - Power Platform | Microsoft Learn.
To create a Dynamics 365 application user
-
Browse to your Power Platform admin center and select Environments. Select your Environment from the list. Details of your environment will be displayed.
-
Select Settings from the top ribbon and then select Users + permissions followed by Application users. A list of application users will appear.
-
Select New app user from the top ribbon. The Create a new app user page will appear. Do the following:
-
Select + Add an app , select the Dynamics 365 application you created earlier (see To register a new Azure application) and select Add.
-
Select the appropriate Business unit from the list.
-
Select
 for Security roles to choose the security roles for this new application user. The following security roles must be assigned to the Application User:
 -
Remote requests to the CRM Dynamics 365 environment
-
Read rights for these entities:
- Account (required)
- Contact (required)
- Cases (required)
- Leads (optional)
-
Activities
-
Write rights for these entities:
- Leads
- Activities
-
-
Select Save then select Create to save the app user.
-
-
Copy the Environment url.
-
Once you have the Environment URL, the ClientID and the ClientSecret, you can set up the ConnectionString using the A365 Password tool. This ConnectionString must be entered in your UCC according to Add the UCC Plugin ConnectionString Setting.