Install Interceptor
Note
An Enterprise license or higher is required to access these features.
Preparation
Before starting the installation, make sure the following preparations are taken on the device that will run the The Interceptor is a service installed on AnywhereNow. It monitors all calls during set-up on endpoints of active Agents. By intercepting that call set-up and redirecting it to an UCC it lets you manage the direct inbound and outbound dialogues of the contact center agents.:
-
Windows features installed
- .NET Framework 4.6.2
-
1 service account with the following rights
- Member of Local Administrator group on the server
- Member of the RTCUniversalReadOnlyAdmins group in the domain
- Provided “Log on as a batch job” rights
- Provided “Log on as a service” rights
- Optionally, provided “Protect object from accidental deletion” rights
-
Open port you use in AgentProviderPort (default 10000) of the firewall between the FE and AnywhereNow server.
When the above preparations are completed, the installation can be continued.
Installing the Interceptor
-
Copy files to the Front End Server(s)
-
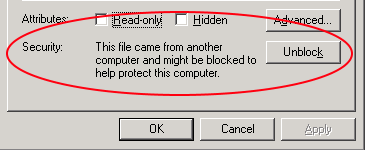
Make sure that the .zip package is unblocked.
- Right click on the .zip file and choose ‘properties’
- Then click Unblock and Apply
-
Unpack the Interceptor zip
-
Open PowerShell as administrator
-
Navigate to the directory
-
Run “install.ps1”
-
Optional:
- Use In Windows Active Directory, a User Principal Name (UPN) is the name of a system user in an email address 'like' format. A UPN (for example: john.doe@domain.com) consists of the user name (logon name), separator (the @ symbol), and domain name (UPN suffix). parameter: install.ps1 -UPN "serviceaccount@domain.com"
- Use SamAccount parameter: install.ps1 -samAccountName "serviceaccount"
-
-
Enter the password of the given service account
-
Enter the FDQN stands for Fully Qualified Domain Name and specifies the exact location in the tree hierarchy of the Domain Name System (DNS). An example for [hostname].[domain].[top level domain] is [www].[microsoft].[com] of the AnywhereNow Server (not the pool)
(Optional) Add more AnywhereNow Servers
Note
Additional AnywhereNow servers can be Passive Failover AnywhereNow servers or other Active AnywhereNow servers. For example an Active AnywhereNow server servicing another regions like EMEA/US/ASIA.
-
Navigate to Install directory
- C:\Program Files\SipInterceptor
-
Open the config:
- Wsp.Anywhere365.SipInterceptor.Service.exe.config
-
The config should look like:
XML<?xml version="1.0" encoding="utf-8" ?> <configuration> <startup useLegacyV2RuntimeActivationPolicy="true"> <supportedRuntime version="v4.0" sku=".NETFramework,Version=v4.5" /> </startup><appSettings> <add key="urls" value="," /> </appSettings> </configuration>
-
Add the FQDN of the A Unified Contact Center, or UCC, is a queue of interactions (voice, email, IM, etc.) that are handled by Agents. Each UCC has its own settings, IVR menus and Agents. Agents can belong to one or several UCCs and can have multiple skills (competencies). A UCC can be visualized as a contact center “micro service”. Customers can utilize one UCC (e.g. a global helpdesk), a few UCC’s (e.g. for each department or regional office) or hundreds of UCC’s (e.g. for each bed at a hospital). They are interconnected and can all be managed from one central location. server
Note
Port should be the same as AgentProviderPort in the UCC config.xml (Default 10000), see: Agent Provider Port (Interceptor)
-
One UCC server:
XML<?xml version="1.0" encoding="utf-8" ?> <configuration> <startup useLegacyV2RuntimeActivationPolicy="true"> <supportedRuntime version="v4.0" sku=".NETFramework,Version=v4.5" /> </startup> <appSettings> <add key="urls" value="http://fqdn1.domain.net:10000" /></appSettings> </configuration>
-
Multiple UCC servers:
XML<?xml version="1.0" encoding="utf-8" ?> <configuration> <startup useLegacyV2RuntimeActivationPolicy="true"> <supportedRuntime version="v4.0" sku=".NETFramework,Version=v4.5" /> </startup> <appSettings> <add key="urls" value="http://fqdn1.domain.net:10000, http://fqdn2.domain.net:10000," /> </appSettings> </configuration>
-
-
Open the Services
-
Start the Interceptor Service
- Sip Interceptor Service
(Optional) Configure update interval
-
Navigate to Install directory
- C:\Program Files\SipInterceptor
-
Open the config:
- SipInterceptor.Service201x.exe.config
-
The config should look like:
XML<?xml version="1.0" encoding="utf-8" ?> <configuration> <startup useLegacyV2RuntimeActivationPolicy="true"> <supportedRuntime version="v4.0" sku=".NETFramework,Version=v4.5" /> </startup> <appSettings> <add key="urls" value="," /> </appSettings> </configuration>
-
Add the following line between <appSettings></appSettings>
XML<add key="updateInterval" value="120" /> - The value is in minutes, 60 is each hour, 120 every 2 hours, 1440 is once every day.
Configure the UCC
When the Interceptor is installed each UCC needs to be configured to use the Interceptor.
Skype for Business Application Endpoint
- Create a new Skype for Business Application Endpoint for the UCC where the Interceptor is going to be used.
- More information about creating a new Application Endpoint, see: Create extra Endpoint.
- Name the Endpoint: sip:[uccname]_dr@[domain]
Warning
Make sure the UCC Endpoint have the correct VoicePolicies. If you limit your Global VoicePolicies, the UCC cannot call to PSTN.
SharePoint Configuration - Endpoints
-
Navigate to the SharePoint Configuration Page of the UCC
-
Open Endpoint List
-
Switch to the "DefaultRoutingEndpointView"
-
Add new DefaultRoutingEndpoint Item
-
Title = The The Session Initiation Protocol, or SIP, is a protocol for multimedia communication (audio, video and data communication). SIP is also used for Voice over IP (VoIP). SIP has interactions with other Internet protocols such as HTTP and SMTP. address of the newly created endpoint (which you have created in part 1)
-
-
Restart the UCC
SharePoint Configuration - Settings
-
Navigate to the SharePoint Configuration Page of the UCC
-
Open the Settings List
-
(Optional) Add new Item for Outbound Interception
Note
Prior to the DC2024.01 update, the setting was referred to as UseOutboundAudioRecording
- Key =EnableOutboundInterception
- Value = true
-
(Optional) Add new Item for Inbound Interception
Note
Prior to the DC2024.01 update, the setting was referred to as UseInboundAudioRecording
- Key = EnableInboundInterception
- Value = true
-
(Optional) Add new Item to show Agent identity when calling outbound
- Key =UseOriginalIdentityWithOutbound
- Value = true
-
(Optional) Add new Item to show Caller identity directly with inbound calls
- Key =UseOriginalIdentityWithInbound
- Value = true
-
(Optional) Add new Item to ignore internal calls (same domain)
- Key = InterUserRecordingDisabled
- Value = true
The Interceptor always needs setting 'EnableOutboundInterception' or 'EnableInboundInterception' (or before DC2024.01, 'UseOutboundAudioRecording' or 'UseInboundAudioRecording') . With both on false, the Interceptor won't intercept any calls going in or out the UCC.
When the Interceptor is installed and configured correctly, you will see the following lines within the log of the UCC:
DEBUG ApplicationBootStrapper - ApplicationBootStrapper AgentProvider. Connected: 10.0.0.0 : frontendserver.fqdn.local
DEBUG ApplicationBootStrapper - ApplicationBootStrapper AgentProvider. Register: , 10.0.0.0 : frontendserver.fqdn.local
If you don't see these lines, please make sure the correct Firewall settings are applied on the AnywhereNow UCC server.